Developer Guide
- Acknowledgements
- Setting up, getting started
- Design
- Implementation
- Documentation, logging, testing, configuration, dev-ops
- Appendix: Requirements
- Appendix: Instructions for manual testing
Acknowledgements
- {list here sources of all reused/adapted ideas, code, documentation, and third-party libraries – include links to the original source as well}
Setting up, getting started
Refer to the guide Setting up and getting started.
Design
.puml files used to create diagrams in this document can be found in the diagrams folder. Refer to the PlantUML Tutorial at se-edu/guides to learn how to create and edit diagrams.
Architecture
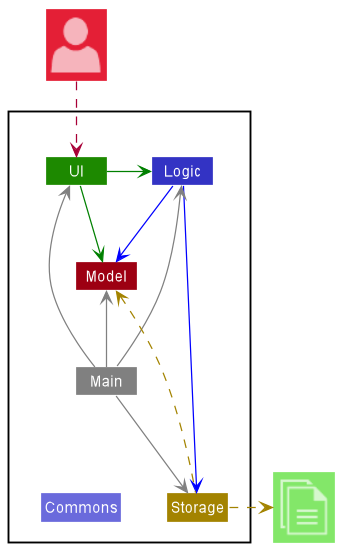
The Architecture Diagram given above explains the high-level design of the App.
Given below is a quick overview of main components and how they interact with each other.
Main components of the architecture
Main has two classes called Main and MainApp. It is responsible for,
- At app launch: Initializes the components in the correct sequence, and connects them up with each other.
- At shut down: Shuts down the components and invokes cleanup methods where necessary.
Commons represents a collection of classes used by multiple other components.
The rest of the App consists of four components.
-
UI: The UI of the App. -
Logic: The command executor. -
Model: Holds the data of the App in memory. -
Storage: Reads data from, and writes data to, the hard disk.
How the architecture components interact with each other
The Sequence Diagram below shows how the components interact with each other for the scenario where the user issues the command rm 1.
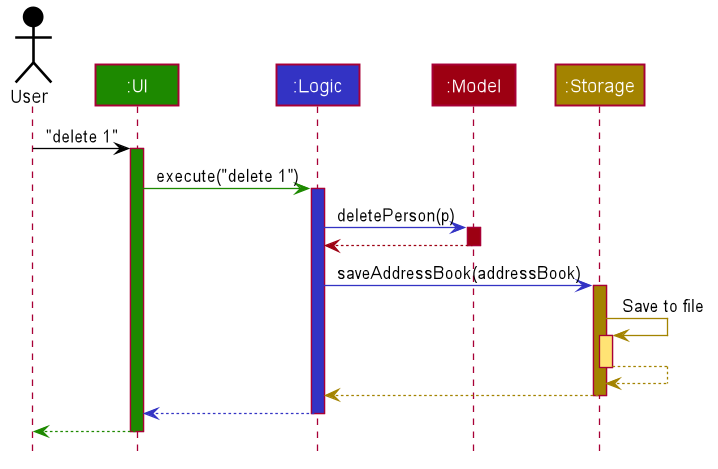
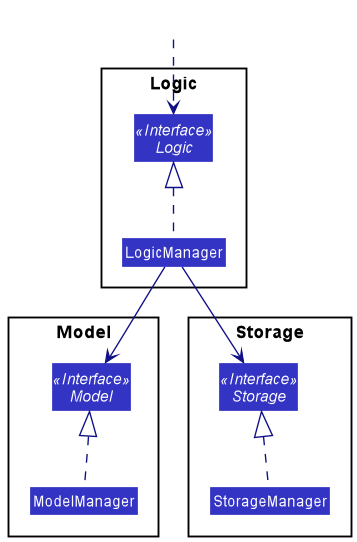
Each of the four main components (also shown in the diagram above),
- defines its API in an
interfacewith the same name as the Component. - implements its functionality using a concrete
{Component Name}Managerclass (which follows the corresponding APIinterfacementioned in the previous point).
For example, the Logic component defines its API in the Logic.java interface and implements its functionality using the LogicManager.java class which follows the Logic interface. Other components interact with a given component through its interface rather than the concrete class (reason: to prevent outside component’s being coupled to the implementation of a component), as illustrated in the (partial) class diagram below.
The sections below give more details of each component.
UI component
The API of this component is specified in Ui.java
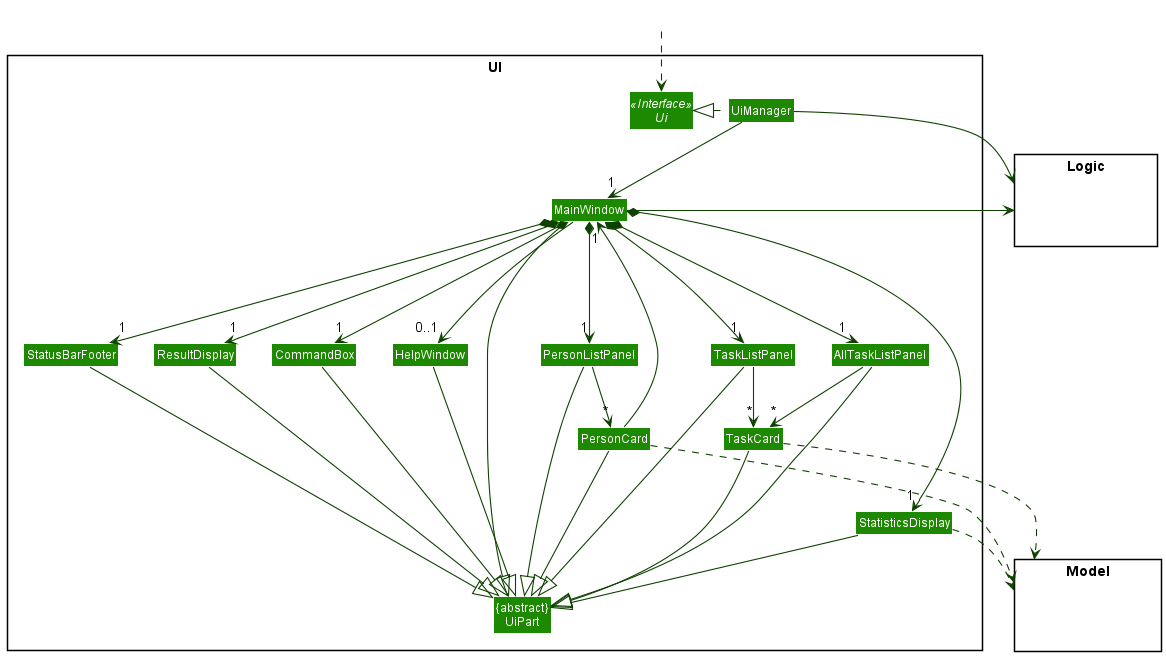
The UI consists of a MainWindow that is made up of parts e.g.CommandBox, ResultDisplay, PersonListPanel, StatusBarFooter etc. All these, including the MainWindow, inherit from the abstract UiPart class which captures the commonalities between classes that represent parts of the visible GUI.
The UI component uses the JavaFx UI framework. The layout of these UI parts are defined in matching .fxml files that are in the src/main/resources/view folder. For example, the layout of the MainWindow is specified in MainWindow.fxml
The UI component,
- executes user commands using the
Logiccomponent. - listens for changes to
Modeldata so that the UI can be updated with the modified data. - keeps a reference to the
Logiccomponent, because theUIrelies on theLogicto execute commands. - depends on some classes in the
Modelcomponent, as it displaysPersonandTaskobjects residing in theModel.
Logic component
API : Logic.java
Here’s a (partial) class diagram of the Logic component:
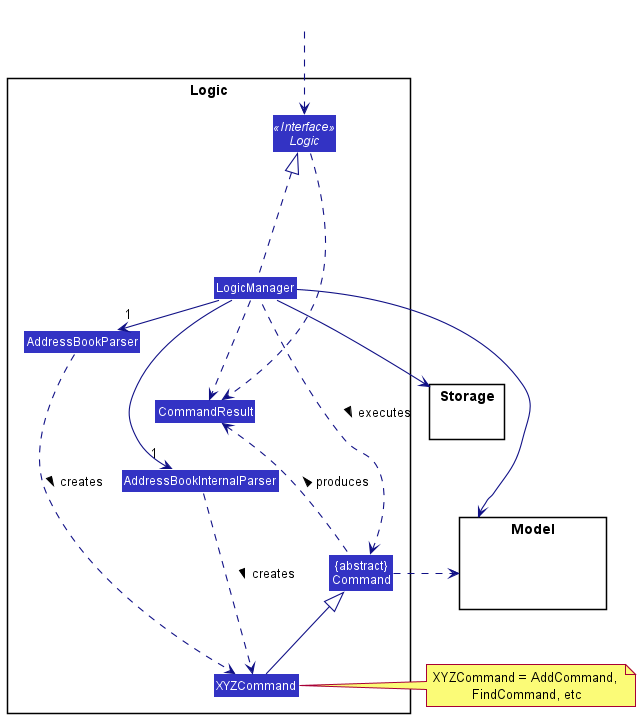
How the Logic component works:
- When
Logicis called upon to execute a command, it uses theAddressBookParserclass to parse the user command. - This results in a
Commandobject (more precisely, an object of one of its subclasses e.g.,AddCommand) which is executed by theLogicManager. - The command can communicate with the
Modelwhen it is executed (e.g. to add a person). - The result of the command execution is encapsulated as a
CommandResultobject which is returned back fromLogic.
The Sequence Diagram below illustrates the interactions within the Logic component for the execute("rm 1") API call.
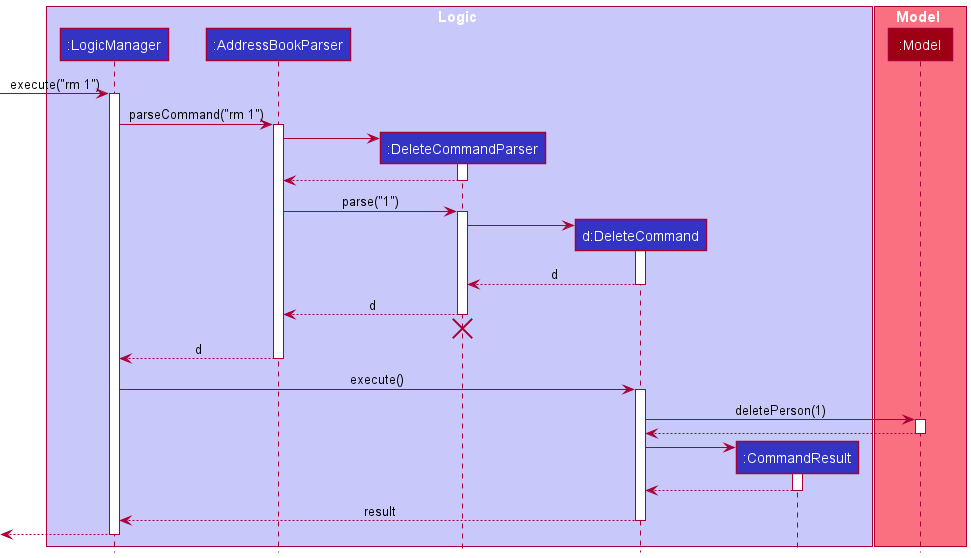
DeleteCommandParser should end at the destroy marker (X) but due to a limitation of PlantUML, the lifeline reaches the end of diagram.
Here are the other classes in Logic (omitted from the class diagram above) that are used for parsing a user command:
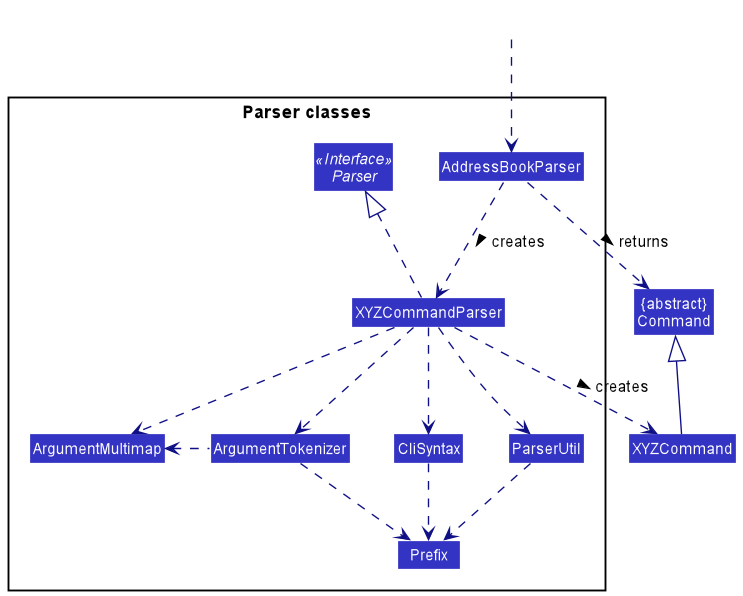
How the parsing works:
- When called upon to parse a user command, the
AddressBookParserclass creates anXYZCommandParser(XYZis a placeholder for the specific command name e.g.,AddCommandParser) which uses the other classes shown above to parse the user command and create aXYZCommandobject (e.g.,AddCommand) which theAddressBookParserreturns back as aCommandobject. - All
XYZCommandParserclasses (e.g.,AddCommandParser,DeleteCommandParser, …) inherit from theParserinterface so that they can be treated similarly where possible e.g, during testing.
Model component
API : Model.java
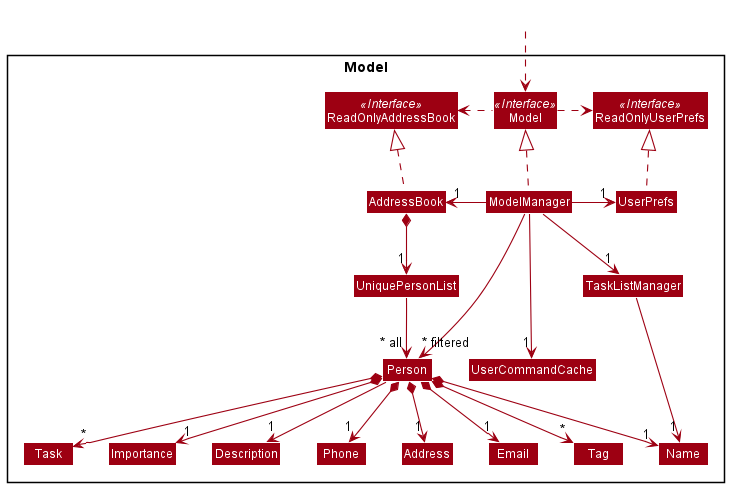
The Model component,
- stores the address book data i.e., all
Personobjects (which are contained in aUniquePersonListobject). - stores the currently ‘selected’
Personobjects (e.g., results of a search query) as a separate filtered list which is exposed to outsiders as an unmodifiableObservableList<Person>that can be ‘observed’ e.g. the UI can be bound to this list so that the UI automatically updates when the data in the list change. - stores the previous user input into the
UserCommandCache - stores a
TaskListManagerobject which is responsible for managing task display operations. It maintains aNameobject of the person whose tasks are currently displayed. - stores a
UserPrefobject that represents the user’s preferences. This is exposed to the outside as aReadOnlyUserPrefobjects. - does not depend on any of the other three components (as the
Modelrepresents data entities of the domain, they should make sense on their own without depending on other components)
Tag list in the AddressBook, which Person references. This allows AddressBook to only require one Tag object per unique tag, instead of each Person needing their own Tag objects.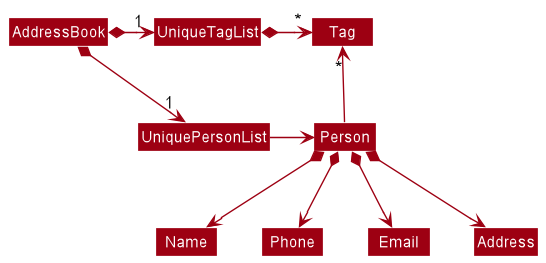
Storage component
API : Storage.java
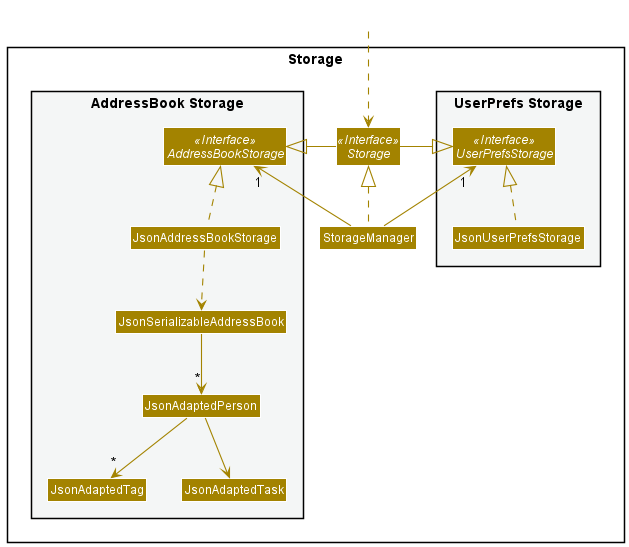
The Storage component,
- can save both address book data and user preference data in json format, and read them back into corresponding objects.
- inherits from both
AddressBookStorageandUserPrefStorage, which means it can be treated as either one (if only the functionality of only one is needed). - depends on some classes in the
Modelcomponent (because theStoragecomponent’s job is to save/retrieve objects that belong to theModel)
Common classes
Classes used by multiple components are in the seedu.addressbook.commons package.
Implementation
This section describes some noteworthy details on how certain features are implemented.
View Task list feature
Displays the task list associated to the specified person onto the taskListPanel of the GUI.
The view task list feature is facilitated by :
TaskListManager :
- It serves as a archive to track the task lists reference of every
Person. -
It maintains an
ObservableListwhich encapsulates aPerson’s task list, and is referenced by theUIfor display on the GUI. - It implements the following operation that support the view task list feature:
-
TaskListManager#setToDisplayTaskList— set the currently displayed task list to the task list of the specified person.
-
This operation is exposed in the Model interface as Model#displayPersonTaskList.
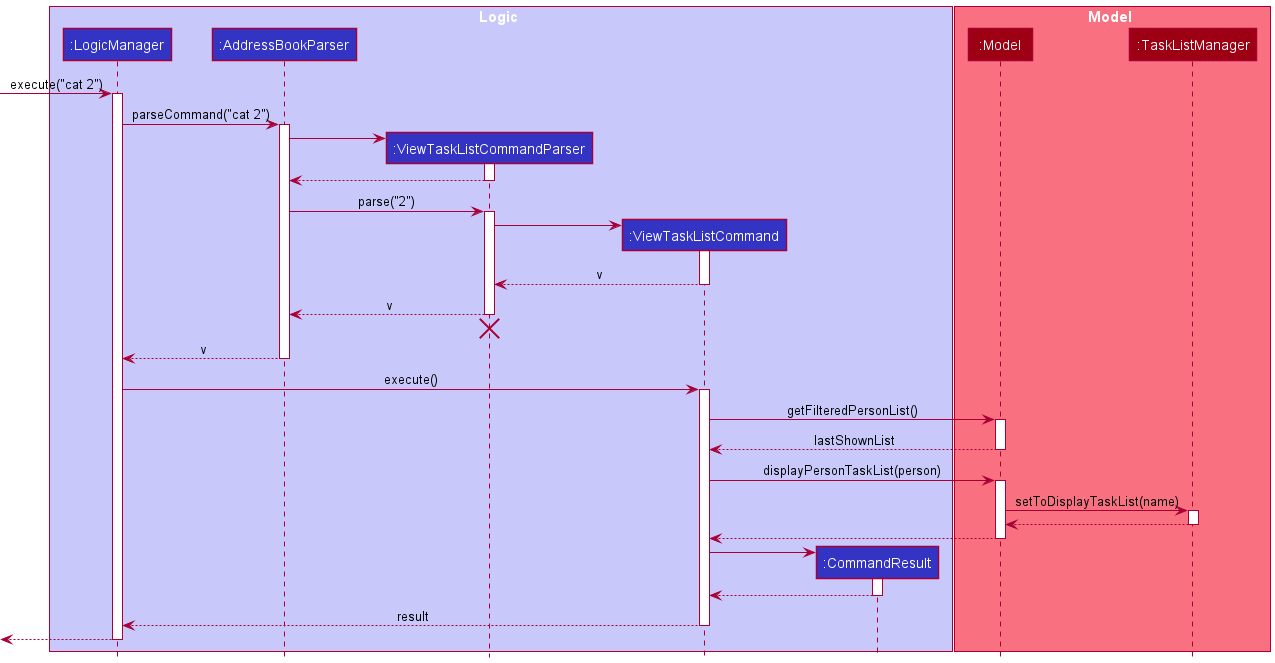
Given below is the example usage scenario:
Step 1. The user launches the ContactSh application. Data will be loaded from the storage to the application memory. The TaskListManager will populate itself with the references of every Person’s task list.
Step 2. The user executes cat 2 command to view the task list of the 2nd Person that is shown on the currently displayed person list.
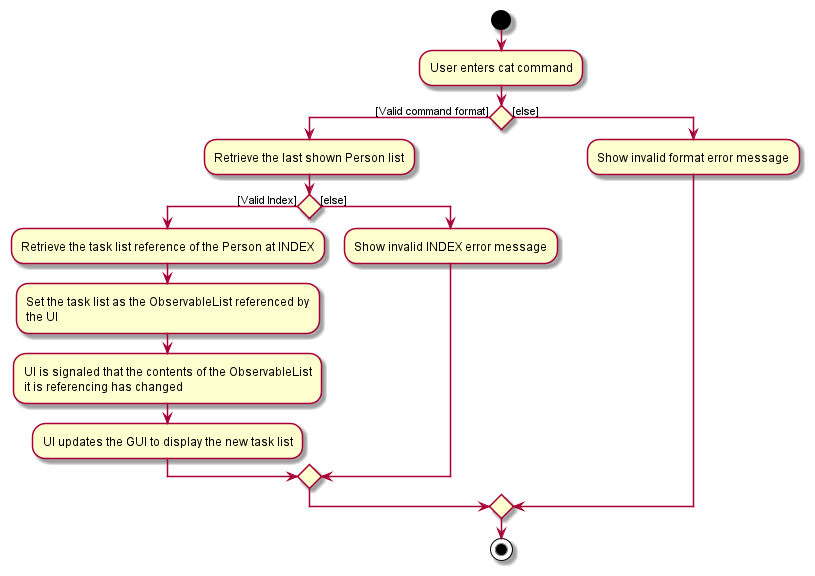
step 3. If the parameters entered by the user is valid, the application will retrieve the task list reference of the specified Person from the archive. The task list reference currently encapsulated by the ObservableList is cleared and is then replaced by the specified Person’s task list reference. Else, ContactSh will display an error message indicating that the user did not type in the parameters correctly.
The following sequence diagram show how the view task list operation works:
cat command:
Design consideration:
Aspect: How to display the task list on the GUI
-
Alternative 1 (current choice): Have two side-by-side panels, left for person list and right for task list.
- Pros:
- User is able to concurrently view more information.
- Cons:
- More work to create and optimize the split panel.
- Content wrapping can was tricky since there is a slider in the middle to resize either panels.
- Pros:
-
Alternative 2: Have only one panel. The person list gets replaced by task list when cat is executed.
- Pros:
- More convenient to implement.
- Cons:
-
listhas to be executed again if user wants to redirect back to the person list (extra overhead which reduces efficiency). - Lesser view of information.
-
- Pros:
Command Cache
The command Cache is the aspect of the program which stores the previous user input. This allows the user to browse through the previous input using the up and down arrow key which simulates the Linux experience.
This function is facilitated by 3 aspects of the program:
- CommandBox in GUI
- InternalCommand in Logic
- UserCommandCache in Model
Caching the command
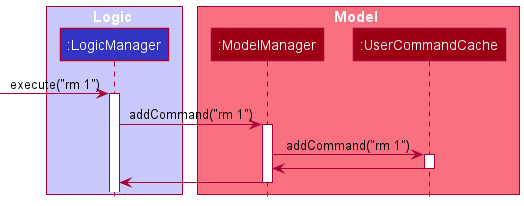
The following sequence diagram demonstrates how the caching mechanism in the Model and Logic unit:
The following activity diagram illustrates how the storage in the cache is handled:
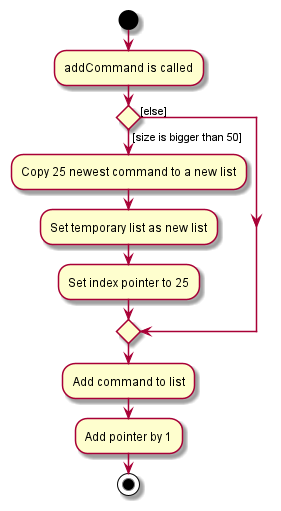
With the current iteration, the cache may hold up to 50 most recent command. However, only the newest 25 command is guaranteed to be saved at all times. The user is not blocked from accessing older commands as it provides additional functionality without too much loss.
Accessing the Cache
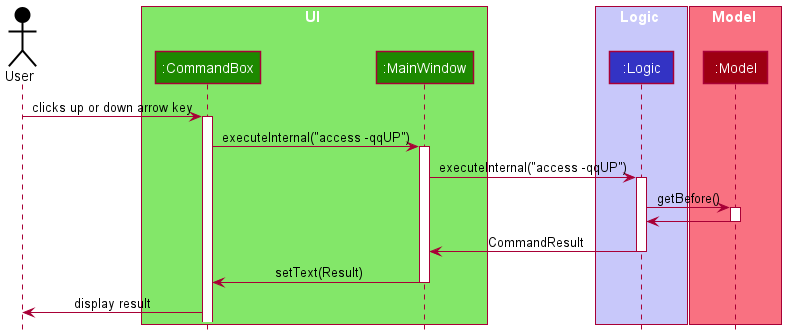
As mentioned before, the caching feature utilises a different kind of command as with other features. The reason will be explored in the design consideration section. Nonetheless, both command type are handled by the Logic unit almost exactly the same way.
The diagram below shows the generation of the internal command in the GUI:
The cache, stored in the Model, is implemented using the Singleton design pattern as there should, at all times, be only one cache existing. A reset function is made for testing purposes. For this reason, cache is placed in it’s own package to ensure that only the test class are able to reset it.
Design Consideration
Aspect: Accessing cache
-
Alternative 1 : Have cache stored in model and piggyback on existing command code.
- Pros:
- A relatively simple design with less possibility of bug
- Less effort needed
- Still maintain cohesion and separation of responsibility
- Cons:
- Could not differentiate between internal and external input command. This leads to either the possibility for user to input the internal commands accidentally, causing bug, or some commands being blocked from running
- Pros:
-
Alternative 2 (current choice): Have cache stored in model and create new internal command.
- Pros:
- No need for command blocking and no possibility for user to accidentally type in the command
- Still maintain cohesion and separation of responsibility
- Cons:
- Increased avenue for bugs
- More coding to be done
- Relatively worse in terms of “repeating yourself”
- Pros:
-
Alternative 3: Have cache stored in UI.
- Pros:
- No need for extraction using commands
- Simple implementation
- Cons:
- Breaks the MVC pattern as UI now saves things
- Decreased cohesion
- Pros:
Find people feature
Displays the people associated with the specified search keywords onto the PersonListPanel of the GUI.
Given below is the example usage scenario:
Step 1. The user launches the ContactSh application. Data will be loaded from the storage to the application memory. The PersonListPanel will be populated with a PersonCard for every person from memory.
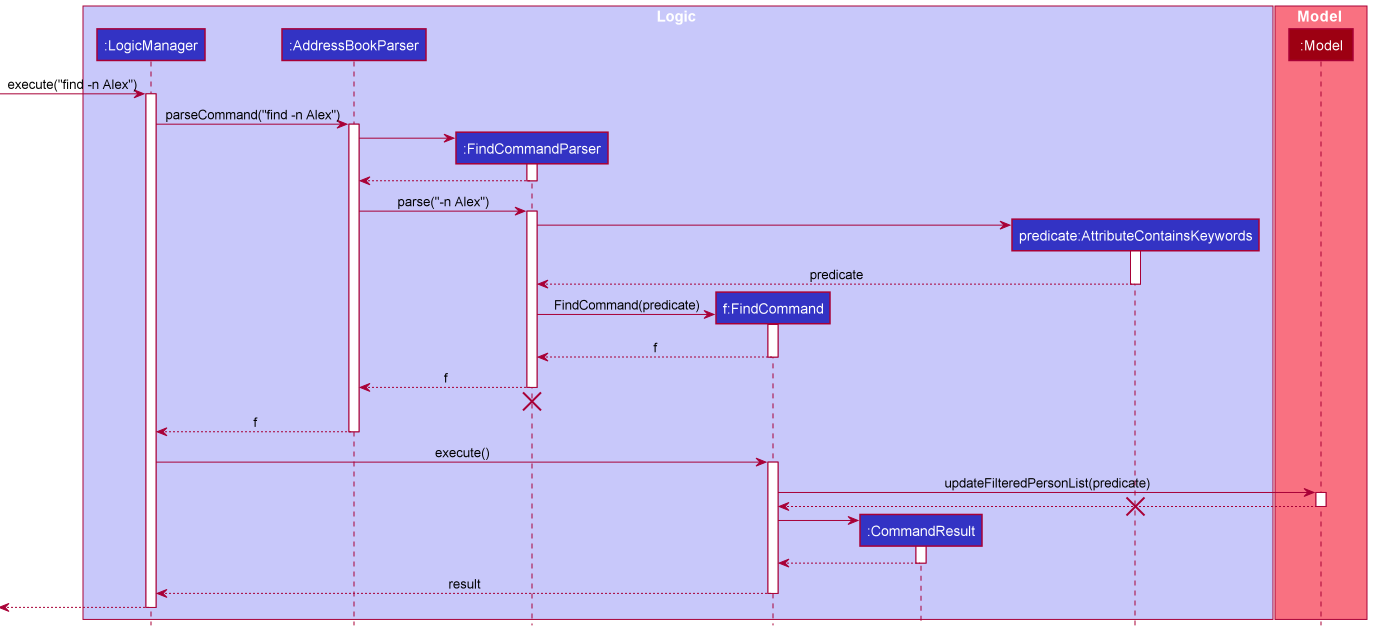
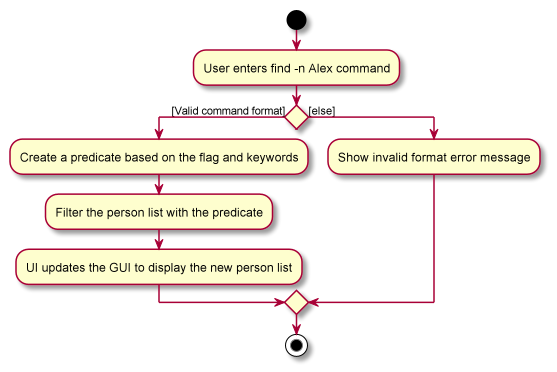
Step 2. The user executes find -n Alex command to find anyone whose name could be abbreviated to be Alex on the currently displayed person list.
Step 3. If the parameters entered by the user is valid, the application will retrieve any Person that matches the keywords given. The person list reference currently encapsulated by the FilteredList will then be filtered based on whether a person has an attribute that matches the keywords. The updated FilteredList is then shown to the user with all matching persons via the PersonListPanel. Else, ContactSh will display an error message indicating that the user did not type in the parameters correctly.
The following sequence diagram show how the find operation works:
The following activity diagram summarises what happens when a user executes a find -n Alex command:
Design consideration:
Aspect: How to find based on the keywords
-
Alternative 1 (current choice): Check that the order of the keywords matches the order they appear in for any person’s attribute (e.g. name) and whether each separate word of a person’s attribute starts with the keywords, ignoring case.
- Pros: The user is able to use abbreviations for certain attributes to find people and not have to worry about exact matching
- Cons:
- The user can no longer find multiple people (using different keywords) and even if at least one of the keywords matches a person’s attribute, it will not display the person if the keywords are out of order and do not all appear in the person’s attribute.
-
Alternative 2: Use exact matching and check if any of the keywords matches a person’s attribute
-
Pros: Easier to implement.
-
Cons:
- Keywords provided must be exact, so even if the user is missing one letter, it will not display the expected person
-
Mark Tasks as done/not done feature
Marks the task specified by the user as done or not done. Tasks that are marked as done are coloured green in the tasklistpanel. Tasks marked as done will not show up as overdue or soon to be due.
Given below is an example usage scenario:
Step 1: The user launches the ContactSH application. Data will be loaded from the storage to the application memory. The PersonListPanel will be populated with a PersonCard for every person from memory.
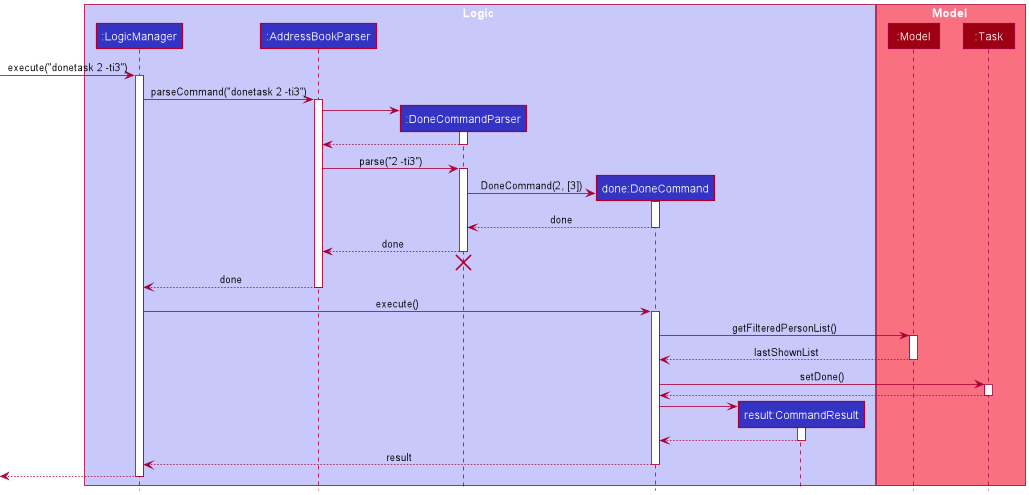
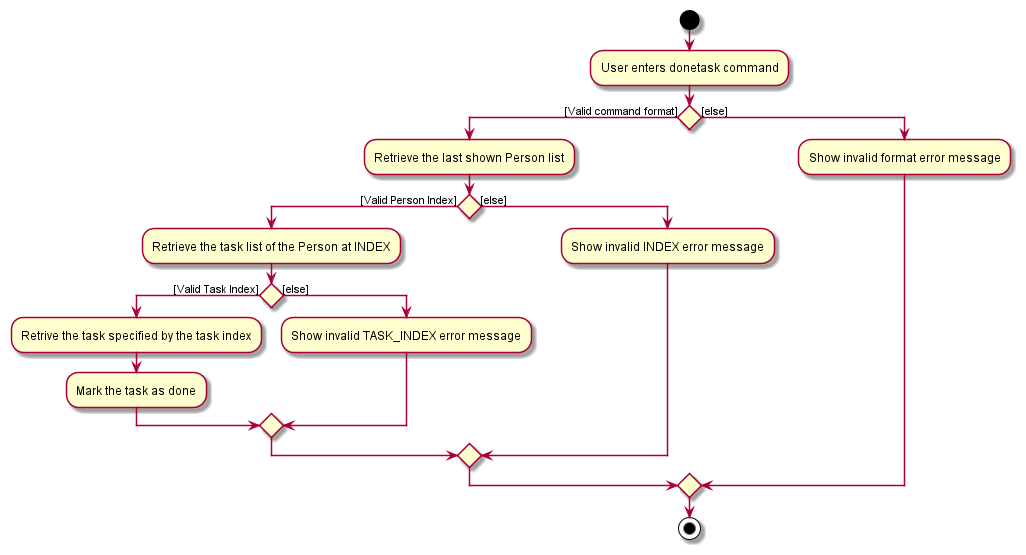
Step 2: The user executes donetask 2 -ti3 to mark the 3rd task of the second person in the list as done.
Step 3: If the specified person and their corresponding tasks exists, the tasks will be marked as done. Else, an error message will be displayed indicating that the parameters are wrong. If the tasks are already marked as done, it will not be marked again. A message will then be displayed showing how many tasks are marked as done, and how many are already marked as done.
The following sequence diagram shows how the mark task as done operation works:
The following activity diagram summarizes what happens when a user executes donetask 2 -ti3:
The undotask command does the opposite - it marks the specified tasks as not done. Tasks that were previously marked as done have their colour in the tasklistpanel changed from green to orange, red or gray, depending if they are soon to be due, overdue, or neither, respectively.
Design consideration:
Aspect: How to mark tasks as done or not done
-
Alternative 1 (current choice): Have separate commands for marking a task as done or not done.
- Pros: Easy to implement, commands have singular purpose.
- Cons: Users need to be use another command to mark task as done.
-
Alternative 2: Add another flag to
editcommand to edit if a task is done or not done.- Pros: Tasks can be marked as done and edited at the same time.
- Cons: Harder to implement, more flags to take note of in the edit command.
Add new task with the same command word as add new person feature
Adds a new task to an existing person using the add command word, similar to adding a new person.
Given below is an example usage scenario:
Step 1: The user launches the ContactSH application. Data will be loaded from the storage to the application memory. The PersonListPanel will be populated with a PersonCard for every person from memory.
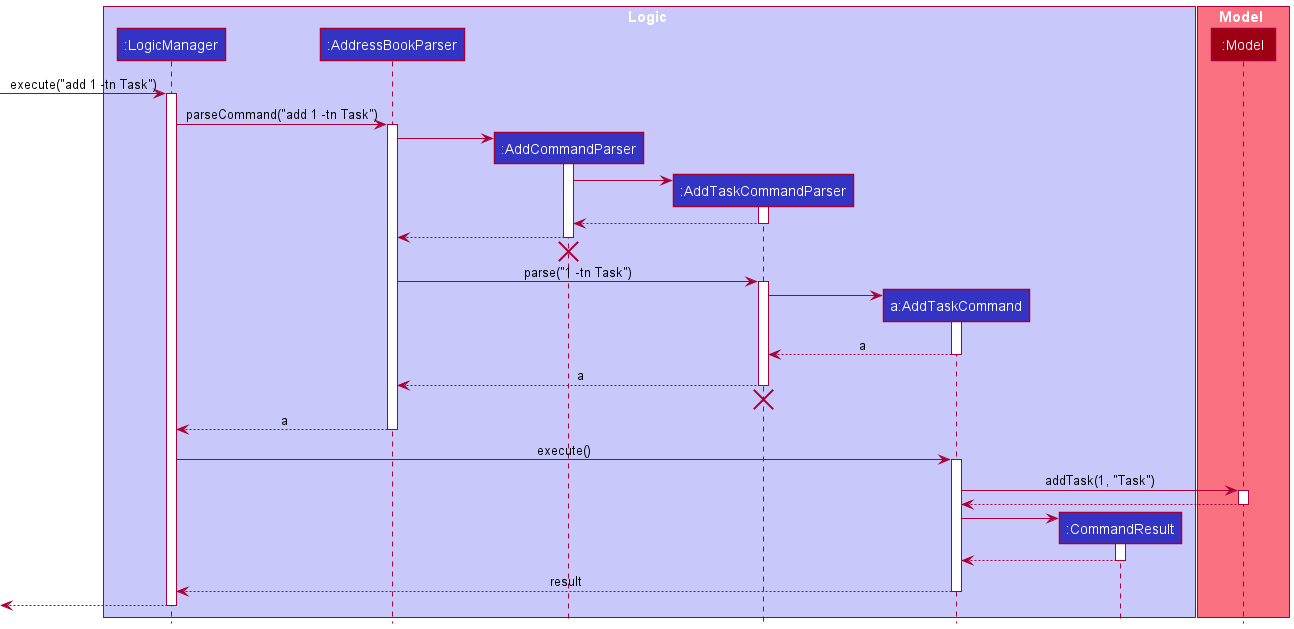
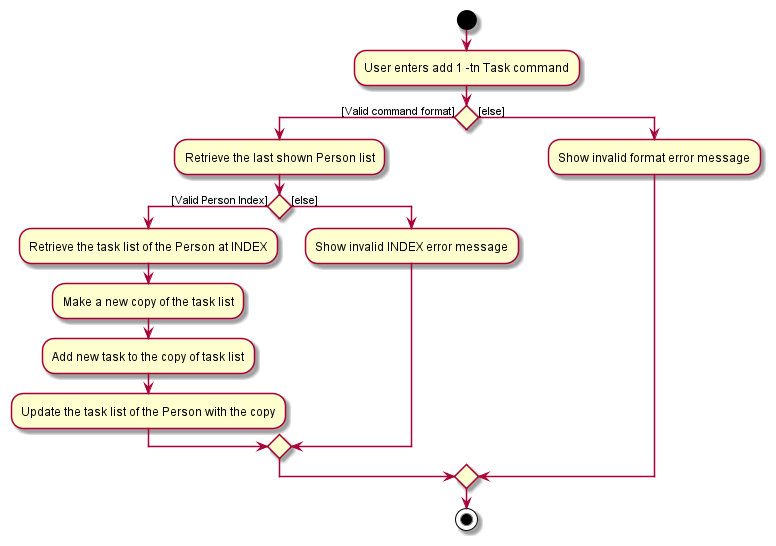
Step 2: The user executes add 1 -tn Task to add a new task named “Task” to the first person in the list.
Step 3: If the specified person exists, a new task named “Task” will be added to the person’s task list. Else, an error message will be displayed indicating that either the person index is invalid or the parameters given are wrong.
The following sequence diagram shows how the add task operation works:
The rm command follows a similar operation sequence. Users are able to delete either a person or a task using the same rm command word.
The following activity diagram summarizes what happens when a user executes add 1 -tn Task:
Design consideration:
Aspect: How to either add a new person or task using the same add command word
-
Alternative 1 (current choice): If the command is to add a new task, invoke
AddTaskCommandParserfromAddCommandParser, returning aAddTaskCommand. Else if the command is to add a new person, return aAddCommanddirectly fromAddCommandParser.- Pros:
- Commands encapsulate the exact command to execute.
- Easier to debug if either command demonstrates erroneous behaviour.
- Cons:
- More testing needed to ensure correct integration.
- More coding to be done.
- Pros:
-
Alternative 2: Handle all commands to add either a new person or task in the same
AddCommandParserandAddCommand.- Pros:
- Simple implementation.
- Less effort needed.
- Cons:
- Increased avenue for bugs.
- Pros:
[Proposed] Undo/redo feature
Proposed Implementation
The proposed undo/redo mechanism is facilitated by VersionedAddressBook. It extends AddressBook with an undo/redo history, stored internally as an addressBookStateList and currentStatePointer. Additionally, it implements the following operations:
-
VersionedAddressBook#commit()— Saves the current address book state in its history. -
VersionedAddressBook#undo()— Restores the previous address book state from its history. -
VersionedAddressBook#redo()— Restores a previously undone address book state from its history.
These operations are exposed in the Model interface as Model#commitAddressBook(), Model#undoAddressBook() and Model#redoAddressBook() respectively.
Given below is an example usage scenario and how the undo/redo mechanism behaves at each step.
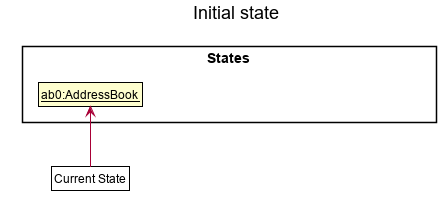
Step 1. The user launches the application for the first time. The VersionedAddressBook will be initialized with the initial address book state, and the currentStatePointer pointing to that single address book state.
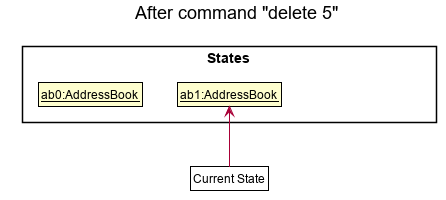
Step 2. The user executes rm 5 command to delete the 5th person in the address book. The rm command calls Model#commitAddressBook(), causing the modified state of the address book after the rm 5 command executes to be saved in the addressBookStateList, and the currentStatePointer is shifted to the newly inserted address book state.
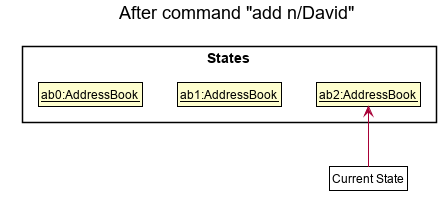
Step 3. The user executes add n/David … to add a new person. The add command also calls Model#commitAddressBook(), causing another modified address book state to be saved into the addressBookStateList.
Model#commitAddressBook(), so the address book state will not be saved into the addressBookStateList.
Step 4. The user now decides that adding the person was a mistake, and decides to undo that action by executing the undo command. The undo command will call Model#undoAddressBook(), which will shift the currentStatePointer once to the left, pointing it to the previous address book state, and restores the address book to that state.
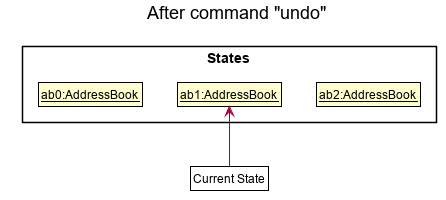
currentStatePointer is at index 0, pointing to the initial AddressBook state, then there are no previous AddressBook states to restore. The undo command uses Model#canUndoAddressBook() to check if this is the case. If so, it will return an error to the user rather
than attempting to perform the undo.
The following sequence diagram shows how the undo operation works:

UndoCommand should end at the destroy marker (X) but due to a limitation of PlantUML, the lifeline reaches the end of diagram.
The redo command does the opposite — it calls Model#redoAddressBook(), which shifts the currentStatePointer once to the right, pointing to the previously undone state, and restores the address book to that state.
currentStatePointer is at index addressBookStateList.size() - 1, pointing to the latest address book state, then there are no undone AddressBook states to restore. The redo command uses Model#canRedoAddressBook() to check if this is the case. If so, it will return an error to the user rather than attempting to perform the redo.
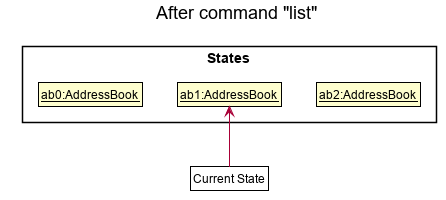
Step 5. The user then decides to execute the command list. Commands that do not modify the address book, such as list, will usually not call Model#commitAddressBook(), Model#undoAddressBook() or Model#redoAddressBook(). Thus, the addressBookStateList remains unchanged.
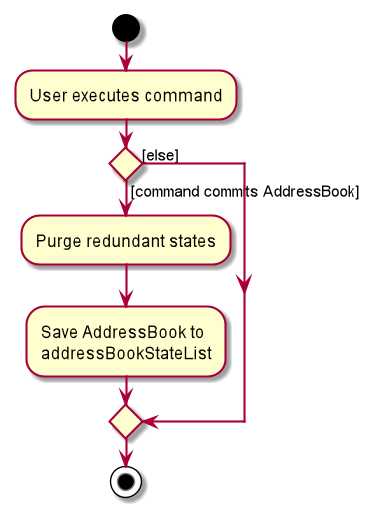
Step 6. The user executes clear, which calls Model#commitAddressBook(). Since the currentStatePointer is not pointing at the end of the addressBookStateList, all address book states after the currentStatePointer will be purged. Reason: It no longer makes sense to redo the add n/David … command. This is the behavior that most modern desktop applications follow.

The following activity diagram summarizes what happens when a user executes a new command:
Design considerations:
Aspect: How undo & redo executes:
-
Alternative 1 (current choice): Saves the entire address book.
- Pros: Easy to implement.
- Cons: May have performance issues in terms of memory usage.
-
Alternative 2: Individual command knows how to undo/redo by
itself.
- Pros: Will use less memory (e.g. for
rm, just save the person being deleted). - Cons: We must ensure that the implementation of each individual command are correct.
- Pros: Will use less memory (e.g. for
{more aspects and alternatives to be added}
[Proposed] Data archiving
{Explain here how the data archiving feature will be implemented}
Documentation, logging, testing, configuration, dev-ops
Appendix: Requirements
Product scope
Target user profile:
- NUS Student Entrepreneurs
- Proficient in Linux style CLIs
- Has many meetings and is in contact with different people (students, mentors, stakeholders, clients, partners)
- Carries Laptop around (prefers Laptop)
Value proposition:
- Users familiar with Unix commands can quickly master using the app efficiently.
- Allow users to keep track of tasks/meetings associated with contacts.
- Enhanced contact searchability and organisation.
- Eliminates the need to remember and recall interpersonal details of contacts.
User stories
* * *, Medium (nice to have) - * *, Low (unlikely to have) - *
epics.
| Priority | As a … | I want to … | So that I can… |
|---|---|---|---|
| general user | have essential functionalities | ||
*** |
general user | update contact details | keep track of up to date details |
*** |
general user | delete contacts | get rid of contacts who are no longer relevant |
*** |
general user | save contacts | keep track of them |
*** |
general user | look through the list of contacts | see the contacts I have added |
| new user | start using the app normally as soon as possible | ||
*** |
new user | purge all example contacts | start adding my own contacts |
| Linux CLI user | have a CLI similar to Linux CLI | ||
*** |
Linux CLI user | use similar commands to Linux CLI | reduce the need to learn new commands |
*** |
Linux CLI user | backtrack commands i have entered before | save time on retyping them |
| student entrepreneur | categorize my business contacts | organize them better | |
** |
student entrepreneur | differentiate between business and student contacts | differentiate easily |
* |
student entrepreneur | organise my contacts according to specific groups | find the ones i want easily |
** |
student entrepreneur | mark my contacts as important | know which contacts i prioritize |
| student entrepreneur | have statistics and indicators for my tasks | improve my tasks management | |
** |
student entrepreneur | view the overall statistics of all my tasks | have an idea of my tasks progression |
** |
student entrepreneur | be reminded when tasks are due or due soon | be aware and take necessary actions to deal with them |
| beginner user | learn how to use the app fast | spend less time on learning | |
*** |
beginner user | view the user guide easily | learn the commands as and when I need |
*** |
beginner user | view the list of instructions | know what instructions are available |
*** |
beginner user | see examples of contacts | have an idea of how contacts will be presented |
| intermediate user | sort and filter my contacts | sieve out irrelevant contacts | |
*** |
intermediate user | search for contacts with the attribute of my choice | find my contacts faster and more accurately |
** |
intermediate user | sort contacts by tasks | identify connections between contacts |
* |
intermediate user | choose what information about my contacts to view | read the information easier |
** |
intermediate user | search for contacts using abbreviations | improve my work efficiency |
| intermediate user | keep track of tasks related to my contacts | ||
*** |
intermediate user | assign tasks to contacts | know what I should contact them for |
*** |
intermediate user | delete tasks from contacts | remove task which are done |
** |
intermediate user | mark a task as complete | still keep the task but know that it has been done |
*** |
intermediate user | view tasks of a specific contact | see what tasks are connected to said contact |
*** |
intermediate user | view every contact’s tasks in a form of a list | an overview of all my tasks |
** |
intermediate user | filter what tasks i view using keywords | narrow down tasks that i am looking for |
| experienced user | manipulate multiple contacts with one command | improve my work efficiency | |
** |
experienced user | delete multiple contacts using only one command | improve my work efficiency |
* |
experienced user | move multiple contacts using only one command | improve my work efficiency |
** |
experienced user | add multiple contacts using only one command | improve my work efficiency |
| experienced user | update large number of contacts at once | exclude manually adding them myself | |
** |
experienced user | import a list of contacts | add a large number of contacts at once |
** |
experienced user | export a list of contacts | send them to other people |
| expert Linux CLI user | use high-level CLI instructions | directly use the app at a high-level | |
* |
expert Linux CLI user | make command combinations | execute multiple instructions in one line |
* |
expert Linux CLI user | redirect input/output | input/output from/to files instead of stdin |
* |
expert Linux CLI user | create scripts | automate specific tasks |
Use cases
(For all use cases below, the System is the ContactSH and the Actor is the user, unless specified otherwise)
Use case: Add a contact
MSS
- User requests to add a contact.
-
ContactSH adds the contact
Use case ends.
Extensions
-
1a. The given contact is invalid.
-
1a1. ContactSH shows an error message.
Use case resumes at step 1.
-
Use case: Edit a contact
MSS
- User requests a list of contacts.
- ContactSH shows a list of contacts.
- User requests to edit a specific contact in the list.
-
ContactSH edits the contact.
Use case ends.
Extensions
-
2a. The list is empty.
Use case ends.
-
3a. The given index is invalid.
-
3a1. ContactSH shows an error message.
Use case resumes at step 2.
-
-
3b. The given edit information is invalid.
-
3b1. ContactSH shows an error message.
Use case resumes at step 2.
-
Use case: Delete a contact
MSS
- User requests to list contacts
- ContactSH shows a list of contacts
- User requests to delete contacts in the list
-
ContactSH deletes the contact
Use case ends.
Extensions
-
2a. The list is empty.
Use case ends.
-
3a. The given index is invalid.
-
3a1. ContactSH shows an error message.
Use case resumes at step 2.
-
-
3b. User requests to delete all contacts in the list.
-
3b1. ContactSH deletes all contacts in the list.
Use case ends.
-
Use case: Find contact(s) by a criterion
MSS
- User requests for contacts satisfying a criterion.
- ContactSH searches for contacts that satisfy the criterion.
-
ContactSH displays the list of contacts that satisfy the criterion.
Use case ends.
Extensions
-
1a. The given criterion is invalid.
-
1a1. ContactSH shows an error message.
Use case ends.
-
-
2a. No result matches the criterion.
-
2a1. ContactSH returns message stating no contact found.
Use case ends.
-
Use case: Find command and its usage
MSS
- User requests for a list of commands.
- ContactSH returns a list of commands.
- User requests for details of a specific command in the list.
-
ContactSH returns the details of the command.
Use case ends.
Extensions
-
3a. The given command is invalid.
- 3a1. ContactSH shows an error message.
Use case resumes at step 2.
Use case: Sort contacts by name
MSS
- User requests to sort contacts by name.
-
ContactSH returns a sorted list of contacts.
Use case ends.
Extensions
-
1a. The reverse flag is given.
- 1a1. ContactSH returns a reverse sorted list of contacts.
Use case ends.
Use case: Edit a task
MSS
- User requests for a list of contacts.
- ContactSh returns a list a contacts.
- User requests for a list of tasks of a contact.
- ContactSH returns a list of tasks of that contact.
- User provides parameters to edit tasks.
-
ContactSH edits tasks.
Use case ends.
Extensions
-
1a. The list is empty.
Use case ends.
-
3a. User requests for list of tasks of all users.
-
3a1. ContactSH returns list of tasks of all users.
Use case resumes at step 5.
-
-
3b. The list is empty.
Use case ends.
-
5a. The given edit information is invalid.
-
5a1. ContactSH shows an error message.
Use case resumes at step 5.
-
{More to be added}
Non-Functional Requirements
- Should work on any mainstream OS as long as it has Java
11or above installed. - Should be able to hold up to 1000 persons without a noticeable sluggishness in performance for typical usage.
- A user with above average typing speed for regular English text (i.e. not code, not system admin commands) should be able to accomplish most of the tasks faster using commands than using the mouse.
- Any changes to the data should be saved permanently and automatically.
- Should be easy to learn and use at all times regardless of the user’s skill with the user interface.
- The project is expected to push deliverables according to the module schedule.
- Should be compliant with the coding standards of the module.
- Documentation for the project, such as the user and developer guides, should be effective and concise.
- Should be logging useful information and tracking sources of errors as they are identified.
- Should be easily testable from different testing approaches (e.g. Integration testing, System testing, automated functional tests, manual tests etc.)
{More to be added}
Glossary
- Mainstream OS: Windows, Linux, Unix, OS-X
- Private contact detail: A contact detail that is not meant to be shared with others
Appendix: Instructions for manual testing
Given below are instructions to test the app manually.
Launch and shutdown
-
Initial launch
-
Download the jar file and copy into an empty folder
-
Double-click the jar file
Expected: Shows the GUI with a set of sample contacts. The window size may not be optimum.
-
-
Saving window preferences
-
Resize the window to an optimum size. Move the window to a different location. Close the window.
-
Re-launch the app by double-clicking the jar file.
Expected: The most recent window size and location is retained.
-
-
Exiting the program
- Use
exitor close the window to end the program.
- Use
Adding a person
-
Adding a person with description more than 500 characters long.
- Enter the following command:
add -nJohn Doe -p98765432 -ejohnd@example.com -aJohn street, block 123 -dThis is a description that is more than 500 characters long. The rest of this message is randomly padded to make up 500 characters.0123456789012345678901234567890123456789012345678901234567890123456789012345678901234567890123456789012345678901234567890123456789012345678901234567890123456789012345678901234567890123456789012345678901234567890123456789012345678901234567890123456789012345678901234567890123456789012345678901234567890123456789012345678901234567890123456789012345678901234567890123456789
Expected: Error message stating that description is too long.
- Enter the following command:
Deleting a person
-
Deleting a person while all persons are being shown
-
Prerequisites: List all persons using the
lscommand. Multiple persons in the list. -
Test case:
rm 1
Expected: First contact is deleted from the list. Details of the deleted contact shown in the status message. Timestamp in the status bar is updated. -
Test case:
rm 0
Expected: No person is deleted. Error details shown in the status message. Status bar remains the same. -
Other incorrect delete commands to try:
rm,rm x,...(where x is larger than the list size)
Expected: Similar to previous.
-
-
{ more test cases … }
Deleting tasks
-
Deleting tasks of a person while the task list of that person is currently shown.
- Prerequisites:
- List all persons using the
lscommand. Multiple persons in the list. - Show the task list of the target person using the
catcommand. - Index of target person must be shown on the person list.
- Index of target task must be shown on the person List.
- Arguments are valid and compulsory parameters are provided.
- List all persons using the
- Test case:
rm 1 -ti2
Expected: 2nd task will be deleted from the list. Details of the deleted task shown in the status message.
- Prerequisites:
-
Deleting tasks of a person while the task list of another person is currently shown.
- Prerequisites:
- List all persons using the
lscommand. Multiple persons in the list. - The index of the target person must be shown on the person list.
- The task list shown must be different from the target person.
- Arguments are valid and compulsory parameters are provided.
- List all persons using the
- Test case:
rm 1 -ti2
Expected: No task will be deleted. Error details shown in the status message.
- Prerequisites:
-
Deleting a non-existent task of a person while the task list of that person is currently shown.
- Prerequisites:
- List all persons using the
lscommand. Multiple persons in the list. - The index of the target person must be shown on the person list.
- The target task index must not be within the task list shown.
- Arguments are valid and compulsory parameters are provided.
- List all persons using the
-
Test case:
rm 1 -ti100
Expected: No task will be deleted. Error details shown in the status message. - Test case:
rm 2 -ti0
Expected: No task will be deleted. Error details shown in the status message.
- Prerequisites:
Saving data
-
Dealing with missing data files
- Delete the data file located at
[JAR file location]/data/contactsh.json. - Run the program.
Expected: A new data file with some example contacts will be created.
- Delete the data file located at
-
Dealing with corrupted data files
- Modify the data file located at
[JAR file location]/data/contactsh.jsonwith incorrect modifications such as replacing phone numbers with a string of alphabets. - Run the program.
Expected: The data file is replaced with an empty file, program starts with no contacts.
- Modify the data file located at